The principle of adjusting the clutch UAZ 3303
Familiar classics
UAZ vehicles have been popular in Russia for more than a decade. They have always been distinguished by high cross-country ability, reliability and good quality of control. The UAZ model range is constantly expanding, developing and improving. Everyone knows that cars are assembled from several thousand parts, and when the car is in operation, it may be necessary to replace any, perhaps even the smallest part, which nevertheless plays a very important role in the life of the car.
There is an opinion that the clutch is one of the most vulnerable places in a UAZ car. The true cause of the problem is that the UAZ 3303 clutch and other cars of this series are incorrectly adjusted. Very often, the maintenance of the mechanism is not given enough attention and its full importance is not realized. With proper and timely care of the diaphragm clutch installed on the car, it will work perfectly for a long period of time, at least five years for sure, and even with rather merciless operation.
A little about the history of the creation of the Soviet SUV
Initially, the UAZ 469 was developed as an army cross-country vehicle, which was intended to replace the older GAZ-69 model. The car was developed from the mid-60s, and began to be mass-produced since 1972, its further modification was the UAZ-3151 (produced since 1985). UAZ-315195 "Hunter" became a civil upgraded version. Three years ago, the Ministry of Defense of the Russian Federation completely abandoned the supply of UAZ, switching to other types of SUVs. Although UAZs have established themselves in the army as reliable, unpretentious vehicles, they are very outdated.
The well-known Loaf model
The UAZ 3303 commercial truck became a further modification of the famous “loaf”, a family of cars from the Ulyanovsk plant, including the very first UAZ 450. It began to be mass-produced back in 1958. The car became the first independent development of the plant, based on the components and assemblies of the GAZ-69 and GAZ-21. The very first tests surpassed all the most daring plans of the designers, the car confidently overcame even a snow cover 50 cm deep, and also drove along a tank track with a load of a ton of weight. The development of the SUV began in the mid-50s, prototypes appeared a month later.
Since the GAZ 69 had an unsuccessful wheelbase, a wagon layout had to be used for the new car, which was developed in two modifications:
- a truck with a wooden body;
- all-metal wagon.
To ensure the necessary body rigidity, ribs were developed on the roof of the van, which visually resembled a bread loaf. In the mid-late 80s, the "loaf" was modernized, the engine remained old, but boosted to 90 horses. SUVs were equipped with an improved dual-circuit brake system and a vacuum clutch disengagement booster, bridges were also upgraded. Names changed again.
UAZ-3303 appeared - a light-duty flatbed truck, UAZ-3741 - a multi-purpose van, UAZ-2206 - a minibus, UAZ-3962 - an ambulance. Ten years later, experiments began at the plant to improve the characteristics and improve the “loaf”, a variety of cars were produced, in particular, the Farmer family, but in the early 2000s the management changed, all new projects were curtailed, since then they have produced one modification - van.
UAZ 3303 clutch adjustment
As you can see, the clutch disc is leading. And we see we have a problem here. The left side was eaten, and the right side remained almost untouched.
The clutch disc was also torn off.
Clutch disc is almost new, no wear. But the disc is tearing for the third time. To identify the cause of the breakdown, we need to reassemble and look. We install it on the adjustment stand, it is important to fix it so that it does not crawl on the table.
The stand is very simple, we fasten the washer to the flywheel, and the bolt is welded to the washer. And you need to make a uniform clamp. We install the clutch disc, install the basket and look at the fasteners.
Then you need to fix the entire structure, as if standing on a car.
We tightened it, having strengthened the structure, we take the compasses and roughly measure the paws with a meter.
We measured and made sure that the paws were damaged on one paw showed 40mm. On the second foot showed 39 mm. and on the third foot showed 37mm. And the working depth should be uniform 41mm. There are adjustment vents on the legs themselves.
They are twisted to the end, and reach the clutch disc itself. This is not good, and broke the clutch disc. After we have identified the problem, we disassemble the basket. First, unscrew the 3 bolts that hold the fork legs. Then loosen the tie screw. Having unscrewed 3 bolts, the main part of the basket is removed, and we see the inside of the basket.
Let's start restoration. During restoration, we notice that one of our forks is skewed.
Unpin the fork and pull it out. The defect of the fork is that the ear of the attachment of the fork itself was broken off.
We drink the finger that holds the fork and see that there is a bearing. We pay attention to the finger and see the scar.
The scar on the finger, and there is the root because of which the breakdown occurred. After replacing the plug, check all the others. And we see that on each finger, there is more and more production.
Having looked at the paws, we find that there is also a defect, as well as on the fingers.
So we need to replace all the paws, fingers and bearings. The reason for the breakdown is that our bearings are open, not protected from dust and moisture. This loses lubrication and the bearing begins to scar, which produces such a large-scale breakdown. To avoid further damage, we go to the trick. We take the chain in step 19 and disassemble it in order to remove the bushings. Having removed the bushings, you need to pinch the edges.
Canticles are needed in order to be able to be pressed into the passes, where the finger with the bearing stood. Having installed the sleeve inside it, we put another one, but with a smaller diameter. We also put it in another hole, but without a small bushing.
UAZ 2206 Vkusnaya Loaf › Logbook › How to pump the clutch on a loaf or we will go soon part 7
Having dealt with the rods, it was time to pump the clutch, earlier this procedure did not bring us any problems, but not this time.
The clutch refused to pump, the working cylinder was covered with a copper basin. Surprisingly, the usual scheme works for us. Decided to change both.
After the replacement, and pumping with small mats (I had to make a key, on the new worker, the pumping fitting was somehow unsuccessfully invented by not ideal engineers), the speeds began to stick.
Ahead of us is the choice of oil in the box, pouring Lukoil something there is no desire, and test runs.
finish with a catchphrase — Well, now it will definitely go!
Adjustment of mechanisms
Parameters after adjustment
It is generally believed that proper clutch adjustment can provide its greatest reliability . First you need to measure the amount of free play at the drive pedal, which turns off the clutch. If the clutch has a diaphragm spring, then the recommended value should be between 5 and 30 mm. After pressing the pedal to the stop, it is necessary to measure its full stroke, the recommended value of which should be approximately 16.5 centimeters. This size can be determined using an ordinary ruler.
If necessary, change the position of the pedal, adjust the length of the pusher, which is located in the master cylinder. This adjustment is carried out as follows: we unscrew the lock nut with a key, we begin to rotate the rods, using pliers. This sets the desired position of the pedal, which will be more convenient. Ideally, a key of 13 can be used for this operation.
It should be noted that a diaphragm spring clutch does not need to be adjusted in the release mechanism, as the spring itself can provide optimal values. In other words, adjusting the clutch UAZ 469, UAZ loaf and UAZ patriot will not be difficult. Clutch baskets can be purchased from specialist shops.
Stroke adjustment
The need for adjustment
Adjustment of the pusher pitch in the clutch slave cylinder is carried out in order for the clutch to perform its tasks correctly. If the adjustment is incorrect, two types of problems can occur.
UAZ Patriot clutch adjustment video
In the first case, there may be an incomplete pressing of the pressure plate to the slave. This happens when the free play of the stem is completely absent or it is less than normal. In this case, slippage of the clutch will be observed, which will inevitably lead to wear of the components.
In another case, when the free play is greater than necessary, a phenomenon such as incomplete clutch disengagement will be observed. In this case, the SUV driver will feel problems with gear shifting, they will turn on poorly, or stop turning on at all. This entails an increase in wear of the synchronizer blocking rings.
This should be summed up and noted that it is very important to monitor the condition of the clutch and add brake fluid to the reservoir in time.
A clutch malfunction on an UAZ Patriot SUV can have serious consequences.
We recommend starting the adjustment of the cylinder rod pitch by cleaning the threads of the adjusting nuts. To do this, it is necessary to lubricate the threads and nuts with a special grease such as WD-40. After that, we proceed to the direct process:
With one key, the adjusting nut is fixed on this element, and the lock nut is loosened with the second.
Using a hand vise or a key on “8”, it is necessary to clamp the end of the pusher from turning it. When the stem is fixed, it is necessary to unscrew the lock nut a few turns back.
After that, the free step is adjusted, bringing it back to normal.
The locknut returns to its original position and fixes the stroke of the rod.
At the end of the work, it is necessary to check the presence of a free step. If it is within the normalized range, then everything was done correctly. This process is not laborious and is done by hand at no extra cost.
Sometimes it is necessary to adjust the UAZ clutch, which consists in changing the position of the clutch pedal. To do this, the main cylinder has an adjusting unit.
Adjustment of the full travel of the UAZ clutch pedal.
The position of the clutch release pedal and its full travel is regulated by changing the length of the pusher of the clutch master cylinder. To do this, by loosening the nut of the pusher adjusting unit, disconnect the pusher fork from the pedal and turning it in the right direction, achieve the desired result.
The total pedal travel for a diaphragm-type pressure spring clutch must be within:
- For cars of the UAZ-3160 and UAZ-3162 family: 130-170 millimeters.
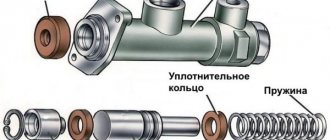
UAZ clutch master cylinder device
The main clutch for UAZ 3151, "Hanter", Patriot with article number 420.469-1602300, has some differences, but not cardinal ones.
It just has an installed reservoir, not a tube and an eye instead of a fork of the cylinder piston pusher. For "tadpoles" and "loaves" the article is 420.3741-1602300. It is quite possible to replace the necessary parts and assemble what you need. How the GTZ works is shown in the figure below.
The device shows how the free play of the clutch pedal is adjusted. To do this, you need to screw or unscrew the pusher fork.
GCC cuffs are a ring and a so-called "fungus" with a diameter of 22 mm.
GCC work
Briefly, the operation of the clutch looks like this:
- When the clutch pedal is depressed, the pusher moves the piston, the compensation hole closes.
- It pushes fluid into the system in front of it, creating pressure.
- This pressure acts on the piston of the working cylinder, and he squeezes the fork through the rod.
- The fork, moving the release bearing, presses on the petals of the basket and removes the pressure plate from the clutch disc.
An important role in pumping is played by the valve and the plate. Even if the system is not pumped, it will still fill up. It is enough to fill in the liquid and unscrew the valve on the working cylinder. It will fill the system by gravity, this also applies to the brakes.
The liquid through the compensation hole enters the cavity in front of the piston through the valve into the line. Once filled, liquid will flow out through the valve. Here, the main thing is that the stem is not extended and the compensation hole is not blocked by the cuff.
When pumping, everything is somewhat different.
- When the piston moves forward, the valve 19 is open.
- When it goes back, the valve is closed and a vacuum is created by the front.
- The piston has holes closed by plate 3. It moves away and opens the holes. Fluid flows from the cavity above the piston and reservoir through the bypass into the discharged cavity in front of the piston. Manzhet (fungus) allows it to flow.
- Having reached the retaining ring, the piston stops, the spring presses the fungus and the plate. It is readiness for a new cycle.
Reasons for wear
Clutch replacement occurs in the following cases:
- Wear due to slip when starting off,
- discrepancy between the engine speed and the speed of movement as a result of clutch wear,
- Jerking of the car when starting off.
In the first case, the car does not have enough torque to start moving. At the included speed sufficient turns are supported, but the machine does not start to move. In such situations, the clutch linings are erased.
The latter case is associated with the weakening of the damper springs on the clutch disc. Weak springs do not dampen shocks. This problem is exacerbated by frequent off-road driving and when replacing standard wheels with larger wheels.
Disadvantages and criticism of cars of the Ulyanovsk plant
Real photo inside the car
Initially, very high fuel consumption, as well as low passive safety: an accident involving a UAZ usually ends tragically. At the time of development, these shortcomings were compensated by the affordable price of gasoline and low traffic intensity, which reduced the likelihood of an accident or an accident to a minimum, but with the passage of time the situation changed, and today the old designs have become morally and technically very obsolete, not corresponding to new realities.
Older models of earlier releases have gearboxes without synchronizers, an unreliable brake system and clutch problems. High fuel consumption in modern times forces owners to either buy newer models equipped with economical injectors or turbodiesels, or to convert existing old cars.
Most owners, especially those with low incomes, do not even try to convert a car; they have one pressing problem - the clutch.
With standard equipment and market quality of components, replacement occurs after 5-7 thousand km when driving on ordinary roads. And when equipping the UAZ with self-locking differentials or gearboxes, especially off-road, the clutch simply does not stand up.
When to Adjust the Patriot Clutch Mechanism
The clutch on the car we are considering, as well as on any other modern car, is one of the most important. If this mechanical unit is faulty, then you will not be able to operate the UAZ Patriot. When the SUV is used quite actively, various parts of the clutch begin to become unusable, and in some cases they need to be adjusted. It is important to correctly use the car, and its clutch, then the unit is able to serve properly 60-80 thousand km. km run. Many will now ask the question: what does it mean to correctly use the car? This means that it is necessary to regularly carry out preventive maintenance, as well as adjust the mechanism we have designated. It is important to remember that on the UAZ Patriot, directly adjusting the clutch pedal must be carried out either annually or every 20 thousand miles. km.
There are other moments when adjustment of the unit is required: for example, there is noise, or when the pedal is fully depressed, jerks occur, during slipping, when the pedal free play is small enough. In such cases, it is necessary to carry out repairs and preventive maintenance in order to identify and eliminate the causes of defects.
Setting the clutch sensor UAZ Patriot
The sensor is designed to generate a signal about the state of the clutch (on or off) and transmit it to the electronic control unit. When receiving a command to disengage the clutch, the automation reduces the amount of fuel injected into the cylinders, thereby reducing the engine speed when the load is dropped.
In the event of a sensor malfunction or improper installation, the speed during gear changes will increase, and when the clutch is engaged, jerks of the car will be observed. If there is an on-board computer, an error message 0704 will appear on the screen. Incorrect operation of the signaling device will affect not only the quality of the car’s movement, but also increase the likelihood of failure of the damper springs.
The clutch contact sensor is located in the passenger compartment and is located above the pedal.
To adjust it you need:
- loosen the sensor fasteners;
- move the sensor to the desired position;
- tighten and crimp the nuts.
A correctly adjusted signaling device should give a command to reduce the fuel supply at the moment the clutch starts to turn off.
Design
The main components of the UAZ-452 clutch:
- driven disk assembly with friction linings;
- pressure plate or basket assembled with a casing;
- release levers.
The stamped steel casing is attached to the engine flywheel with six centering bolts. It is made with three windows, which include the protrusions of the cast-iron pressure plate.
Six steel springs are installed between the pressure plate (basket) and the casing.
Their compression force ensures the transmission of torque from the flywheel further through the casing, the pressure plate to the driven disc. In order to prevent the transfer of heat from the springs, washers made of heat-insulating material are installed on the side of the pressure plate.
Modern cars are equipped with a hydraulic drive instead of a mechanical drive . The fluid creates increased pressure, making it much easier for the driver to control the pedal.
Clutch replacement
The clutch of UAZ Patriot SUVs is being replaced on a viewing hole or overpass. In this case, the following operations are performed:
- The cardan shaft is unscrewed from the gearbox and hand brake, removed. Unscrew and remove the clutch slave cylinder.
- The catalyst is removed, then the gearbox disassembly begins: the oil is drained, the handbrake cable is disconnected, the plugs are disconnected, the bolts are unscrewed.
- The gearbox is removed.
- The clutch basket and discs are unscrewed and removed.
- Installing a new clutch occurs in the reverse order of removal.
Additional tools may be needed to replace the clutch. To unscrew some fasteners, you will need extension cords. To remove the gearbox, which weighs quite a lot, you can use a jack and nylon slings. The ropes will help lift the checkpoint into place.
When installing the driven and pressure (basket) clutch discs, they must be centered relative to the flywheel. This is done using a mandrel, which is included in the crankshaft bearing. It can be replaced with the gearbox input shaft.
On all UAZ vehicles (Patriot, "loaf", Hunter and others), timely replacement of the clutch is required. Then they will work properly for a long time.
UAZ clutch disc replacement
Removing the pressure and driven clutch discs SEQUENCE OF ACTION Remove the gearbox.
Remove clutch slave cylinder
Using the “12” key, we unscrew the four bolts securing the lower part of the clutch housing. One of the bolts to the clutch housing is attached to the tip of the "mass" wire.
Remove the lower part of the clutch housing with the gasket.
We mark with a chisel the relative position of the flywheel and the drive disk ("basket") of the clutch.
Holding the flywheel from turning with a screwdriver or a mounting spatula, with a “12” wrench, evenly unscrew the six bolts securing the “basket” to the flywheel. Only two "basket" mounting bolts are accessible at a time. To access the rest of the flywheel bolts, turn it by hooking the crown teeth with a screwdriver.
We remove the "basket" and the driven disk.
The driven disc hub protrudes more on one side than on the other. This side should face the gearbox. We install the driven and driving disks on the flywheel and fix them with bolts. We do not tighten the bolts in order to maintain the mobility of the driven disk.
