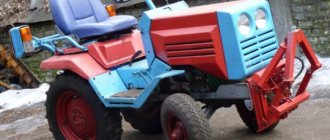
Features of assembling a tractor from Zhiguli
Before assembling a tractor from a Zhiguli with your own hands, you need to draw up a diagram. To create it, the manufacturer will need to take into account the dimensions of all installed parts in the plan. In order to avoid mistakes that will have a bad effect on the design of the homemade product, it is best to paint each of the elements separately. In addition, the manufacturer needs to prepare a separate drawing, which will indicate the features and dimensions of the finished Zhiguli tractor design. It will be possible to navigate along it when welding the supporting structure and manufacturing other assemblies.
There are several important factors to consider when drawing up a diagram.
These include:
- the correct location of the gearbox used;
- installation of a protective casing on the engine, which will prevent the driver from getting burned on a hot cylinder;
- the location of the fuel tank from the Zhiguli car;
- frame dimensions - by shortening it, the manufacturer will be able to reduce the consumption of fuel consumed by the tractor;
- strengthening the front suspension - this is necessary not only to balance the homemade product, but also to protect its nodes in case of an accidental impact.
An important role in assembling a tractor with a VAZ engine is played by a car model, on the basis of which a homemade product will be made. For example, an agricultural machine based on the VAZ-2106 will turn out to be quite powerful. This will allow you to use it for the active implementation of complex chores. At the same time, a car assembled on the basis of the VAZ-2108 or on the basis of its improved model VAZ-2109 will turn out to be more passable. When using these vehicles, the manufacturer will be able to assemble an agricultural vehicle with a 4 × 4 wheel arrangement. Some manufacturers on the basis of these cars can even make tracked units. But most often, the VAZ 02 or VAZ-2103 models are used to assemble a homemade tractor from the Zhiguli. In these cases, agricultural machines are obtained as simple and economical as possible.
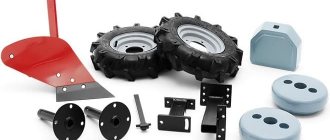
In addition to the motor, a tractor from the Zhiguli will need to install a gearbox. It can be taken from an old GAZ-53 truck. The undercarriage of the homemade product will need to be equipped with wheels that can be “borrowed” from a non-working cultivator, walk-behind tractor or MTZ-82 tractor.
For convenient operation of a homemade tractor from the Zhiguli, it must be equipped with a seat, which can also be taken from a VAZ car. The front and rear axles are also used from Zhiguli.
Driving an all-terrain vehicle on a caterpillar track
The control of the all-terrain vehicle is the same as on the tractor, it is carried out by levers. Differentials located on the sides were implemented from VAZ disc brakes.
In the cab, in the middle of the floor, there is a pneumatic lever - a caterpillar tensioner. The ideal option would be to use a mechanical tensioner, as it is more unpretentious to repair, but the author of this all-terrain vehicle decided otherwise and installed a pneumatic tensioner.
How to make a homemade tractor from Zhiguli?
No less important than the preparation of drawings and components is the correct procedure during the assembly of a homemade tractor from Zhiguli. Having made the slightest mistake during installation, the manufacturer will need to redo half of the structure - this will take a lot of time and effort.
To exclude this, you need to act in this order:
- First you need to create a kinetic scheme. She will tell the manufacturer the best way to transfer the force generated by the motor to the working bodies of the homemade product. To do this, in the diagram you will need to indicate the type of transmission mechanism and the sequence of its operation;
- After that, you need to prepare the supporting structure for homemade with a motor from VAZ. The frame must be as reliable as possible in order to withstand the shock and strong vibration of the motor when it is running at high speeds. As a rule, metal channels and corners are used to assemble the structure. Their surfaces must first be coated with a product that will protect the iron from rust. It is best to apply several layers of primer to the frame parts, and after it dries, paint the structure. After that, the components of the frame will need to be welded together, following the instructions of the drawings;
- Then you need to proceed to the manufacture of the chassis for the tractor from the Zhiguli. For her, you need to assemble 2 bridges that will be attached to each other with the help of hinges. The result will be a kind of turning point, which will make the unit more maneuverable and allow it to turn freely in a relatively small area. So that the fracture does not jam when turning at an acute angle, it must be liberally lubricated with grease;
- Next, the mini-tractor will need to be equipped with a brake system. Together with the parking brake mechanism, it is best to take it ready-made from a Zhiguli car;
- After that, wheels must be installed on the finished axles. If the homemade product must be equipped with large diameter wheels, then the manufacturer must redo the bridges and the braking system in advance. The wheels must be inflated with air with a pressure of at least 2 atm for each;
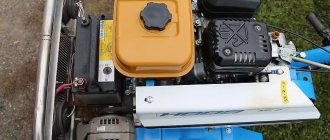
- Then you need to arrange a place for mounting the engine. To reduce its vibration, a sheet of dense rubber will be required between the motor and the supporting structure. It needs to be secured with screws. Then a protective casing is installed on top of the motor, as well as an exhaust system. The main exhaust pipe must point away from the operator;
- The operator can then move on to installing the seat. It is best to put old car springs under it - they will smooth out the bumps in the road. A tractor with a Zhiguli engine must also be equipped with steering controls;
- At the last stage, the homemade product will need to be equipped with a hinge mechanism. It is quite difficult to make it, so you can take a ready-made unit from an old tractor. For stable operation of the hitch, it must be equipped with cylinders and a pump that will pump the finished liquid. As a result, the manufacturer will have a simple hydraulic system. By supplementing it with a PTO operating at a speed of 540 rpm, it will be possible to install a wide range of active and passive mounted implements on a homemade product. Another not superfluous element is a hook for installing a trailer. You can learn more about assembling a tractor from a Zhiguli from the video.
Production of individual snowmobile elements
The principle of reworking a motorcycle, chainsaw and moped is almost the same. If you learn how to make individual elements, it will be much easier to do it.
Suspension
Particular attention when converting a vehicle into a snowmobile is given to the rear suspension. It is in dire need of improvement. For its manufacture you need to prepare:
After preparation, you can start making the suspension:
- Connect the front arm to the sliding rails on one side and to the chassis on the other using hinges.
- Do the same with the rear lever.
- Position the torsion springs between the slide rails and the rear torque rod.
- Place the fastening of two load-bearing elements between the suspension arms.
To mount the suspension, lever ties are used.
Engine
The choice of engine for a snowmobile is an important step, since the power of the vehicle depends on it, its ability to move on snowy roads.
The optimal engine power for a snowmobile is considered to be in the range of 6-30 hp. With.
Therefore, these vehicles are most often made with a Lifan engine or with a part from a motorcycle or moped.
Snowmobile lift
This device may be required if the snowmobile is stuck in snow or needs repair. Making a kind of jack is easy:
- From a metal corner with a width of 25 mm, make a design like a channel. Height - 19 cm. In the middle, make two holes for attaching the fork.
- Weld a plate to the bottom, which will act as a guide. Place a similar part on top, but do not fix. The distance between them is 14 cm.
- Make holes in these plates through which to pass the jack pipe. Make the top one spring loaded.
- Place another part at an angle next to the top plate, which will play the role of a hook and hold the spring-loaded part.
- Make a fork for the lift. Its length is 12 cm. Fix one side in the channel. Place the second mounting axis at a distance of 67 mm. Insert a piece of pipe into the fork that passes through the second axle. Weld a metal ring to this pipe (you can take a metal plate in which to make additional holes for rubber bands), through which pass the jack pipe.
- Fix this ring with motorcycle rubber bands on the platform under the spring of the upper plate. So that the elastic bands do not slip, they can be fixed with screws.
wheels
For good cross-country ability, the vehicle is made on cameras. Snowmobile wheels must be large diameter. But it is better to equip the structure with skis. They can be made from plywood, large diameter pipes. If possible, they can be taken from another snowmobile, including a children's one. Additionally, it will be necessary to make rotation bushings for them, while the presence of bearings in this system is optional.
Homemade caterpillar snowmobiles feel good. It is possible to make this part yourself. The caterpillar is driven by wheels that are located inside it, for which wheels from garden equipment are suitable. The part itself can be made of plastic pipes, even if two-track snow scooters are made. Pipes with a diameter of 4 cm are suitable. If they are sawn, they can perform the function of caterpillar lugs.
No matter what vehicle is being converted to a snowmobile, how big the changes are, and who made the design, it is recommended that you first pass the test in the open. If they passed without problems, then you can go to longer distances.
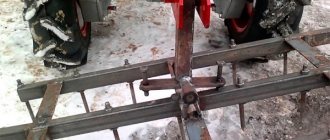
Construction began with the manufacture of the frame:
The frame is assembled and welded from a profile pipe according to our own drawings.
Were purchased:
engine, caterpillar, rollers, driven and driven shafts with sprockets, drive and driven variators (Safari drive variator).
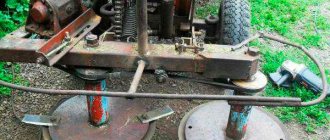
After that, the assembly of the chassis began:
The build process has started:
Installation of a driven variator with a belt on the frame.
Assembling the front suspension, installing the engine and adjusting the variators. The engine, for smaller vibration, is established on rubber pillows.
All components and assemblies were installed in their places, after which the manufacture of skins began:
The lining of the engine compartment is made of plastic (polypropylene).
The seat is made on a metal frame with soft padding and covered with artificial leather.
And here he is, handsome! Standing in the yard and waiting for snow